How to get your Alexa skill ready by Kotlin
Aakash Mehta•2 Jan 19•4 min read
Alexa, Ask myweather What is the weather here today. ⛅
Hola folks 👋, from the title you might have got an idea about what we will be discussing here. Adding more to it, here we will take a deep dive to know how we can be able to integrate simple Alexa skill using Kotlin. And for that, we will use weather API.
To create simple AWS lambda function make sure you full fill following requirements.
- An account in the Amazon developer console.
- Kotlin supported integrated development environment ( I personally like Intelij Idea from Jet brains).
- AWS user account with AWS lambda service access.
We will divide the skill creation process into 3 parts.
1. Create skill in Alexa dashboard.
2. Create AWS lambda function using Kotlin.
3. Publish lambda function on AWS cloud.
1. Create skill in Alexa dashboard.
To create simple custom skill you simply need to follow steps provided by Alexa documentation. Alexa developer console is too much user-friendly to perform custom skill creation steps. So as a note you will need to follow these steps to build a skill.
- Step 1: Design a Voice User Interface
- Step 2: Set Up the Skill in the Developer Console
- Step 3: Use the Voice Design to Build Your Interaction Model
- Step 4: Write and Test the Code for Your Skill
- Step 5: Beta Test Your Skill (Optional)
- Step 6: Submit Your Skill For Certification
I would highly recommend reading this Alexa submission checklist before building any skill so that you can get smooth way for skill submission. 📝
2. Create AWS lambda function using Kotlin.
In section 1, while creating skill we need to develop one lambda function to handle logic in Step 4.
Requirements :
- Java version >= 1.7
- kotlin version >= 1.1.3–2
- Alexa Skills Kit
- Apache dependencies: Commons Lang, HttpClient, HttpCore
- AWS lambda dependencies: java core, log4j
- DarkSky Forecast API
Implementation :
To implement you need to follow the steps as mentioned below.
- Create custom SpeechletRequestHandler class and implement your skill
- Create custom Speechlet class and handle voice intents over there.
To create custom Speechletwe need to implement Speechlet class and it’s delegate methods. To communicate with Alexa user we have to provide our questions or answers in form of SpeechletResponse that can ask response or tell response which can be generated using SpeechletResponse.newAskResponse() and SpeechletResponse.newTellResponse() respectively, for simplicity you can use following methods to get Speechlet responses.
When the user invokes our skill then initially skill session starts by following method. Here we can initialize our global variables or other callbacks.
After we need to provide some skill introduction or welcome message to the user. For that, there is a method in Alexa life cycle named onLaunchwhere we can return SpeechletResponse
And now the main logic of the skill will be in onIntent where we will be able to get all user inputs and related information in form of intent and slots which we defined in Alexa dashboard in Step 1.
And at last but not least we need to destroy all our variables and callbacks when the session ends.
In our skill, we have used 3rd party weather API called DarkSky Forecast API, and OkHttp for network integration. You can simply ask Alexa,
Alexa, ask my weather for weather here today
to know current weather status at your location or you can get weather for any location. You can get the full source code at end of this blog. 👇
3. Publish lambda function on AWS cloud.
So now let the world know your work 📺. To publish your skill you’ll need to publish your AWS lambda function on AWS cloud.
For that, you need to create a jar file for lambda function you created in Step 2 using the following command.
mvn assembly:assembly -DdescriptorId=jar-with-dependencies package
and you’ll find your jar at target folder, you need to pick filename ending -jar-with-dependencies.jar.
Then you’ll need to navigate to lambda service in AWS.
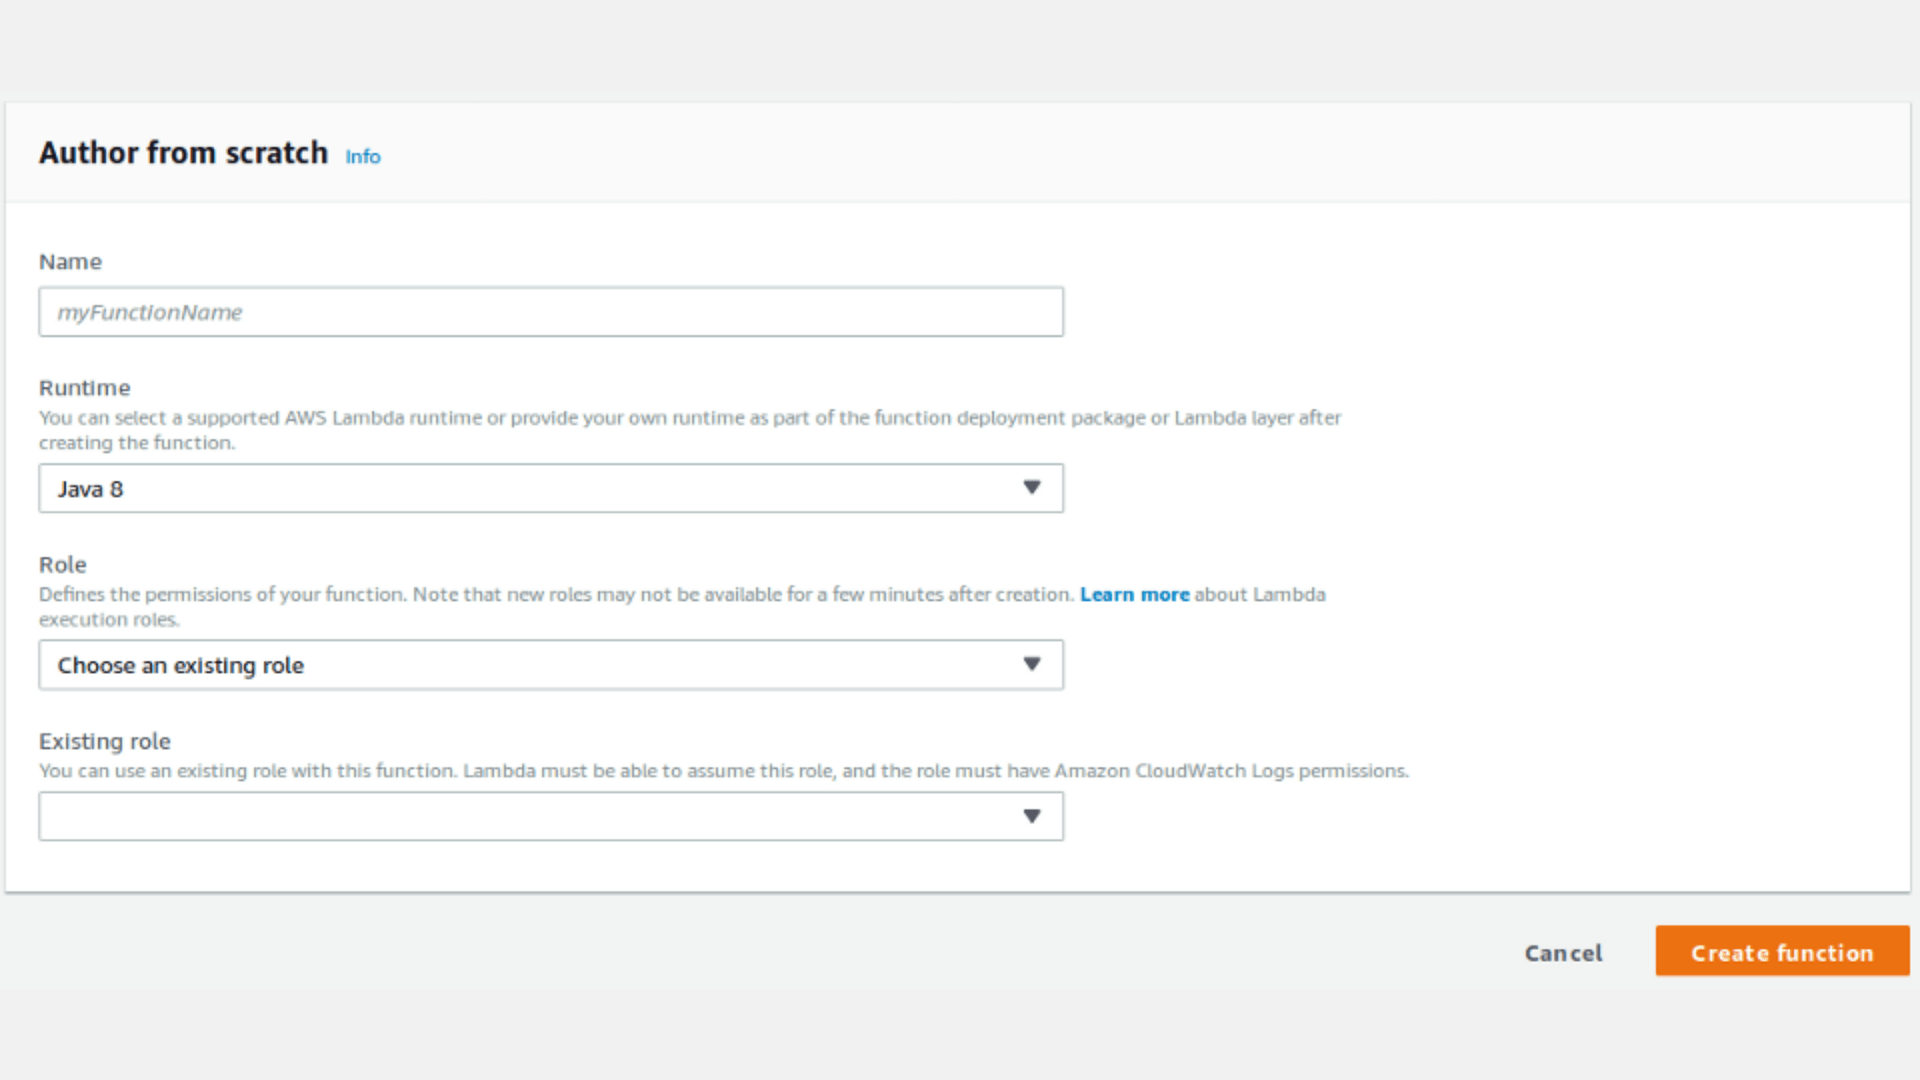
On clicking Create function button at top right corner you will get the following page. Here you need to select function pattern as Author from scratch and Runtime java 8.

After creating a function you’ll be navigated to function details page where you need to set your skill id and resource which we created in Step 2.

Here choose Alexa Skills Kit as a trigger from the left side. On clicking that you will get an option to enter your skill id, which you will be able to get from Alexa developer console as described in step 1.
Then you’ll have to upload your source. Click on lambda function name (here we have used a sample as a function name), and you’ll get the following section.

Here you’ll need to upload your .jar file and provide a fully qualified path of SpeechletRequestHandler class.
Then save your function, copy ARN from the top right corner and paste in Alexa dashboard and we are ready to go. ✈️
Conclusion
You can create custom Alexa skill with minimum resources. You’ll need proper voice design to match Alexa requirements and basic programming skill and TADA you can teach Alexa new skill.👨🏫