
Being web developers, we all love Ruby on Rails. And we have our own reasons. But, one of the reasons why we love Ruby on Rails (RoR) is the simplicity, which eases the way we code.
One of the simplest functionalities, which most RoR developers love is, creating gems in Ruby.
What are gems in Ruby?
A gem in Ruby programming language is a software package in which Ruby applications or libraries can be distributed in a single format.
But, then most of our newbie web developers ask these questions-
Why should we create a gem? It is ultimately a rails code, so why can’t we add a code in one of the module files and use it in our projects?
And to that, the answer is Yes. We can use that method. But sometimes, if the code seems more general than the project-specific code, it should be converted to a gem so that it can be reused and shared with multiple projects. This will ultimately help you to maintain a clean line of code as well as will reduce the duplication of the code.
Recently in one of our projects, there was the functionality of sending notifications using FCM. FCM gem already exists in Rails to fulfil the functionality. But we wanted to integrate upgraded APIs from FCM itself, which the existing gem was not using.
And, how do we do that?
To adapt the newer APIs, one way was to code manually to send the notifications using FCM APIs. But, that is not a good idea because the “notifications” functionality is something which is going to be used in the majority of the projects.
So, we thought to have a private gem which will have a core logic of sending notifications to the devices using FCN non-legacy API, which can be further used in many such projects.
So, we will see the step by step process of how we can create a gem in Ruby on Rails. So here we go!!
Creating a Gem from Scratch
Now let’s start with setting up our gem. Here we will be creating a gem with bundler. So to begin creating a gem using Bundler, use the bundle gem command like this:

1. Name your gem:
Before running above command we should know how to name your gem. There are some naming conventions to be followed.
- Use dashes and extensions (every dash represents a structure (folder, module))
— For example if we have a gem name like gem gem-structure-demo_notifier
— It will be included in one of the files like require ‘gem/structure/demo_notifier’
— And its class or module will have a name like module/class Gem::Structure::DemoNotifier
- Use underscores (represents a joining in the class name)
— For example if we have a gem name like gem demo_notifier
— It will be included in one of the files like require ‘demo_notifier’
— And its class or module will have a name like module/class DemoNotifier
- Don’t use uppercase letters
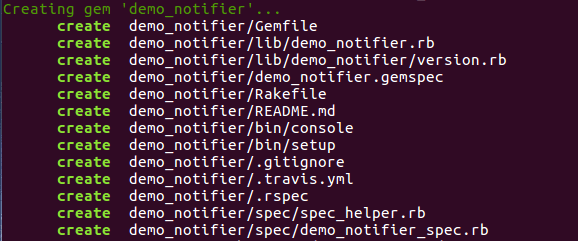
The command we have specified above will create the following file structure for creating a gem.
If this is your first time running the bundle gem command then you will be asked whether you want to include the CODE_OF_CONDUCT.md and LICENSE.txt files with your project.
We will see what all files are generated with gem bundle command and have a brief description for each file :
- Gemfile: This file manages gem dependencies for our library’s development. File contains a gemspec line meaning that Bundler will include dependencies specified in demo_notifier.gemspec. It’s best practice to specify all the gems that our library depends on in the gemspec file.
- Rakefile: Requires Bundler and adds the build, install and release Rake tasks by way of calling Bundler::GemHelper.install_tasks. The build task will build the current version of the gem and store it under the pkg folder, the install task will build and install the gem to our system and release will push the gem to Rubygems for public consumption.
- CODE_OF_CONDUCT.md: Provides a code of conduct that is expected from all contributors to your gem to follow. It will only be included if you chose to have it included.
- LICENSE.txt: Includes the MIT license. It will only be included if you chose to have it included.
- demo_notifier.gemspec: The Gem Specification file. This is where we provide information for Rubygems’ consumption such as the name, description and homepage of our gem. This is also where we specify the dependencies our gem needs to run.
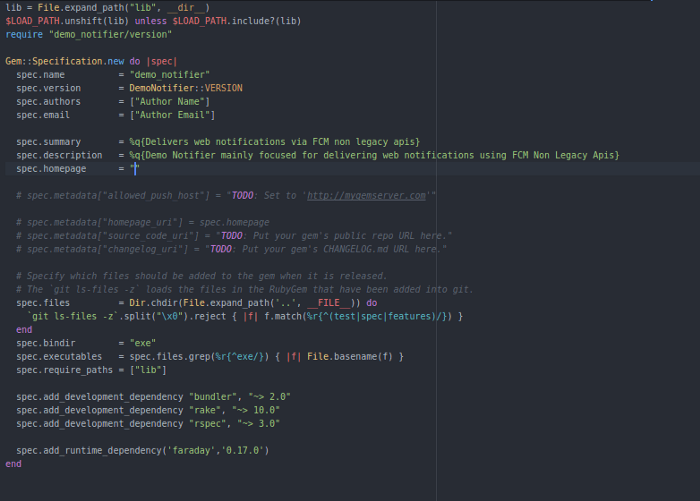
In the gemspec file as you can see there are dependencies called development dependencies. So what is this exactly?
It’s what you use while creating the gem. Things like rspec, rake and bundler should be in this file, because those might not be necessary for the people adding this gem to their Gemfile.
In this file we will also have to include the version of a gem we are creating. This version will reference DemoNotifier module’s variable VERSION.
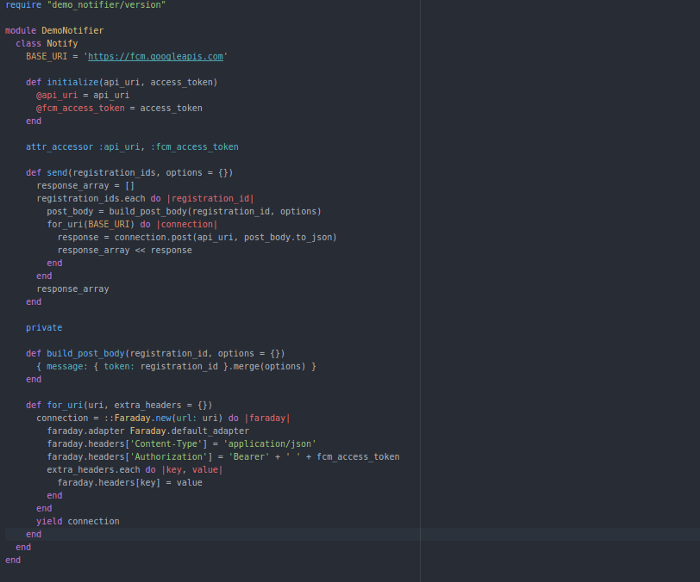
- lib/demo_notifier.rb: The main file to define our gem’s code which will be required by Bundler when our gem is loaded. This file defines a module which we can use as a namespace for all our gem’s code. Here we have added the core logic of sending notifications to devices in demo_notifier.rb file like this :
- lib/demo_notifier: This folder should contain all the code (classes, etc.) for our gem. The lib/demo_notifier.rb file is there for setting up our gem’s environment, whilst all the parts of it go in this folder. If our gem has multiple uses, separating this out so that people can require one class/file at a time can be really helpful.
- lib/demo_notifier/version.rb: Defines a demo_notifier module and in it, a VERSION constant. This file is loaded by the demo_notifier.gemspec to specify a version for the gem specification.
Versioning of a gem requires some conventions to be followed as follows:
- A gem version is a string of 3 numbers divided by dots — ‘X.X.X’.
- Incrementing any one of the digits has a different meaning i.e what level of the change has been made to the gem at the time of releasing.
— Increasing the third number, means the ‘build’ number means that the change was small and did not affect the functionality of the gem.
— Increasing the second number (A minor number) means the changes include adding new functionality, but the gem did not lose compatibility with the previous versions.
— Increasing the first number ( A major number) means that the changes made to the gem were so severe that it’s no longer compatible with the previously released versions.
2. Test your gem:
Now after configuring all the above-mentioned things, it is important to test the written code.
Testing the gem is a very important part when building a gem. It helps to assure you that your code works, and helps others know that the gem is working perfectly fine. When going through any gem, Ruby developers always check a solid test suite as one of the main reasons for trusting that piece of code which they want to include in their applications.
For writing test cases gem file structure also creates rspec related in which you can write the test cases using rspec guidelines and test your code through the test cases. Here in our file structure, the main rspec test cases will be written in demo_notifier/specs/demo_notifier_spec.rb
To run the test cases you can run rspec or bundle exec rspec. If the result is green then the code is working fine and good to go.
3. Generate the build:
Now that we have completed the coding of a gem we want it to be used in other projects. For this, we will run the build command.

This command will build the gem and output a gem file as follows:

4. Push the Gem :
Finally, after building the gem it’s time to push the gem. There are two ways of pushing your gem.
For pushing the gem to RubyGems you will need to create an account on RubyGems.org. Once that’s finished, use your email and password when pushing the gem (RubyGems saves the credentials in ~/.gem/credentials for you so you only need to log in once).
After that, it is just a matter of making it available to rails communities around the globe through rubygems.org. This is done with two simple commands:

And once its done run following command :

With this command, the gem will be pushed and will be available on RubyGems.
Sometimes we want to keep our gem private and don’t want to share it with the world. But RubyGems doesn’t support that.
So to keep the gem private you can push your gem to a private Github Repository and include the gem to your project using github url with oauth credentials. And if we don’t want to include oauth credentials to the url then you can add the ssh key to the gem repository and gain access from where you are installing the gem.
This way your gem will become private and will only be accessible to limited people.