This guide is meticulously crafted to walk you through each step of the PWA development process. Imagine creating an application that not only delivers a seamless, app-like experience directly from the web but also thrives in the face of connectivity challenges, ensuring your users remain engaged whether they're online or navigating through internet dead zones. By the conclusion of this blog, you'll not only have achieved this feat by developing your own PWA complete with a service worker to cache essential resources but you'll also master the art of making your web app installable, thanks to the web app manifest file.
Furthermore, you'll learn the process of making your web app installable via the web app manifest file, extending accessibility to users whose browsers support this feature.
Before delving into actual code, it's crucial to understand a fundamental prerequisite when utilizing a service worker—it necessitates HTTPS. Failure to serve your site over a secure connection will result in the browser refusing to load the service worker. The sole exception to this rule is during development, where localhost and its equivalents are permitted. While this requirement may seem arbitrary, it ultimately ensures the integrity of the service worker by safeguarding them against potential tampering during transit across the network.
The service worker empowers you to intercept, modify, and redirect network requests. While we aim to harness this capability for positive ends, it's imperative to acknowledge the potential for misuse by malicious actors. The HTTPS requirement instills confidence that the installed service worker remains untampered throughout its journey across the network.
Before proceeding, ensure you're familiar with service workers; if not, you can refer to the blog here: Service Worker.
Let's dive in.
Register service worker and cache the resources in our app on the initial load
The initial step entails registering the service worker within your web app. Begin by creating an empty service-worker.js file in the root directory of your project.
Note: The navigator object contains information about the browser.
Since not all browsers support service workers, let’s implement a conditional statement to ensure that the registration occurs only if the browser supports this feature.
//index.html
<script>
if ("serviceWorker" in navigator) {
    navigator.serviceWorker
      .register("service-worker.js")
      .then(function (registration) {
        console.log("Service Worker Registered", registration);
      });
  }
</script>
Note: One reason why service worker registration can fail while working on localhost is due to an incorrect path to your service worker file. It must be specified relative to the origin, rather than your app's root directory. For instance: if the service worker resides at http://localhost/web-apps/service-worker.js, and the app's root is http://localhost/web-apps/, the path should be written as /web-apps/service-worker.js, not /service-worker.js.
When the service worker is registered, its functionality is constrained to the specified scope, meaning it will only handle requests within that scope.
In the above scenario where the service worker is registered at the root directory, it implies that the service worker's scope encompasses the entire origin. However, if you specify /files/service-worker.js, the service worker will exclusively handle requests related to files within that directory.
Upon initial registration, the service worker triggers the install event. This is the perfect time to pre-cache all the required resources. Let us add the event listener that will fire on the install event so that you can cache the required resources.
//service-worker.js
var cacheName = "cache_version1";
var cacheFiles = [
  "./static/js/bundle.js",
  "./static/media/preloader.c158de6c.gif",
];

self.addEventListener("install", function (e) {
  console.log("[Service Worker] Installed");
  e.waitUntil(
    caches.open(cacheName).then(function (cache) {
      console.log("[ServiceWorker] Caching cacheFiles");
      cache.addAll(cacheFiles);
    })
  );
});
First, you need to initialize the cache by using caches.open and providing a unique cache name. Once the cache is opened, you can utilize cache.addAll, which accepts a list of URLs (resources you wish to store in the cache). It then fetches these resources from the server and adds their responses to the cache. However, it's essential to note that cache.addAll operates atomically. If any of the files fail to fetch, the entire caching process will fail.
Note: The tool at chrome://serviceworker-internals/ is incredibly useful. It provides insights into all installed service workers, their current state, and allows for updates or removals as needed.
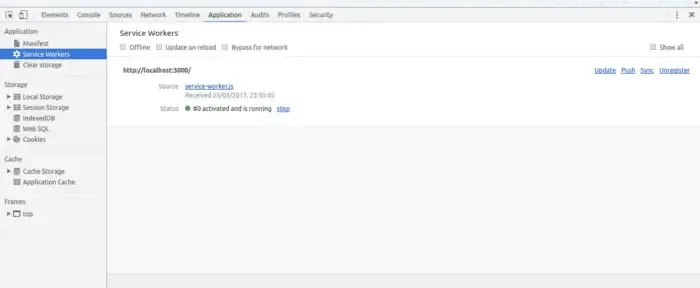
If your browser supports it, you can also explore Service Workers under the Application tab in the Developer Tools.
Check that the status of the service worker for your site has become ACTIVATED.
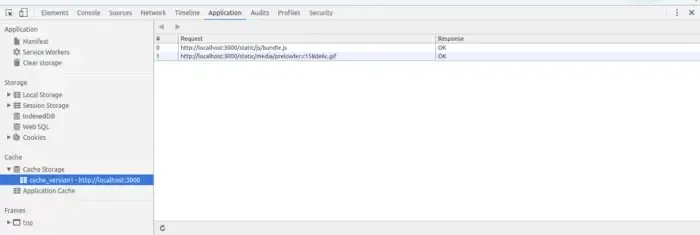
Check that the required resources have been cached under the specified cache name.
Update the old service worker and cache the new response in Cache Storage
You learned how to register a service worker and cache resources in our app during the initial load. Now, let's delve further into the behavior of service workers. When you navigate to a page with a service worker already registered, and subsequently open another page within the scope of that service worker, the browser doesn't create another instance of the service worker; it utilizes the existing one. This means that regardless of how many tabs or windows are open, only one service worker instance exists.
But what happens when you update the service worker? The new service worker patiently waits in the wings until all windows using the previous service worker are closed.
To circumvent this waiting game, we can employ skipWaiting() within the install event and clients.claim() within the activate event. These commands ensure that without any delay, the new service worker seamlessly assumes control of the pages.
//service-worker.js
var cacheName = "cache_version2";
self.addEventListener("install", function (e) {
  console.log("[Service Worker] Installed");
  e.waitUntil(
    caches
      .open(cacheName)
      .then(function (cache) {
        console.log("[ServiceWorker] Caching cacheFiles");
        cache.addAll(cacheFiles);
      })
      .then(function () {
        return self.skipWaiting();
      })
  );
});
self.addEventListener("activate", function (e) {
  console.log("[Service Worker] Activated");
  e.waitUntil(self.clients.claim());
});
What happens to the files previously stored in the cache after a service worker update? The browser doesn’t know whether you are going to need the old ones or not. So, it falls upon you to manage the removal of any unused files from the cache. The activate event is the perfect place to do this.
//service-worker.js
var cacheName = "cache_version2";
self.addEventListener("activate", function (e) {
  console.log("[Service Worker] Activated");
  e.waitUntil(
    caches
      .keys()
      .then(function (cacheNames) {
        return Promise.all(
          cacheNames.map(function (thisCacheName) {
            if (thisCacheName != cacheName) {
              console.log(
                "[Service Worker] Removing Cached Files from",
                thisCacheName
              );
              return caches.delete(thisCacheName);
            }
          })
        );
      })
      .then(function () {
        return self.clients.claim();
      })
  );
});
During the activation event, it retrieves current cache keys and iterates through them; deleting any keys not matching the specified cache name.
In your browser, refresh the Cache Storage to see the latest cache resources.
Note: If your service worker file remains unchanged, continuing to reference the old version, ensure that your browser cache's maximum age is set to zero (cache max age: 0).
Also read: PWAs: From Niche to Norm?
Get out the resources from the cache and intercept the network requests
You've seen how resources are stored in the cache. But how do you retrieve them, especially on a slow or nonexistent network? To achieve this, you must intercept all network requests by managing the fetch event in the service worker.
//service-worker.js
self.addEventListener("fetch", function (e) {
  console.log("[Service Worker] Fetching REQUEST URL", e.request.url);

  e.respondWith(
    caches
      .match(e.request)
      .then(function (resp) {
        console.log("Response from Cache", resp);
        return resp || fetch(e.request);
      })
      .catch(function () {
        return console.log("Error Fallback");
      })
  );
});
The operation of caches.match involves assessing the request, initiating a fetch, and verifying if the requested resource exists in the cache. Subsequently, it either serves the cached version or fetches it from the network. The response is then relayed back to the page using e.respondWith.
Moreover, it's possible to duplicate the network response and store it in the cache. This enables future requests to swiftly retrieve the cached response, enhancing page loading times.
It's important to note that service workers do not support the POST request method. Consequently, POST requests cannot be cached in the Cache Storage via service workers.
//service-worker.js
self.addEventListener("fetch", function (e) {
  console.log("[Service Worker] Fetching REQUEST URL", e.request.url);
  e.respondWith(
    caches
      .match(e.request)
      .then(function (resp) {
        console.log("Response from Cache", resp);
        return (
          resp ||
          fetch(e.request).then(function (response) {
            return caches.open(cacheName).then(function (cache) {
              cache.put(e.request, response.clone());
              return response;
            });
          })
        );
      })
      .catch(function () {
        return console.log("Error Fallback");
      })
  );
});
Your application can now cache its resources upon initial load, ensuring subsequent visits retrieve all resources from the cache, even when offline.
Service workers are extremely flexible, allowing you to decide how resources are cached. Let's explore some caching strategies:
1. Cache First, Then Network:
Serve the request from the cache if available; otherwise, attempt to fetch the resource from the network.
2. Network First, Then Cache:
Initially, attempt to fulfill the request by fetching from the network. If the network request fails or times out, fallback to the cached version.
3. Cache Only:
Attempt to fulfill the request exclusively from the cache. If the resource isn't cached, the request fails.
4. Cache and Network Race:
Fetch the resource simultaneously from both cache and network. Respond with whichever resource arrives first.
5. Cache Then Network:
Initiate parallel requests to both cache and network. Display the cached data first, then update both the cache and the page upon arrival of network data.
These are a handful of caching strategies and choosing the right one depends on your application's specific caching requirements.
Make our web app installable via the Web App Manifest File
The culmination of our journey toward creating a progressive web app involves making your web app installable through the web app manifest.
In addition to the service worker, another critical component of progressive web apps is the Web App Manifest File. This file, written in simple JSON format, grants you control over how your app appears to users and how it should be launched. With the Web App Manifest File, you can specify details such as the splash screen configuration. Once configured, your web app will launch in full-screen mode, devoid of any URL bar, offering a seamless and immersive user experience.
Create manifest.json at the root directory of your project:
{
  "name": "Progressive Web App",
  "short_name": "Pwa",
  "start_url": "index.html",
  "display": "standalone",
  "theme_color": "#d9ebf9",
  "background_color": "#d9ebf9",
  "description": "Progressive Web App",
   "icons": [
        {
            "src": "pwa.png",
            "sizes": "48x48",
            "type": "image/png"
        },
        {
            "src": "pwa.png",
            "sizes": "96x96",
            "type": "image/png"
        },
        {
            "src": "pwa.png",
            "sizes": "128x128",
            "type": "image/png"
        },
        {
            "src": "pwa.png",
            "sizes": "144x144",
            "type": "image/png"
        },
        {
            "src": "pwa.png",
            "sizes": "192x192",
            "type": "image/png"
        },
        {
            "src": "pwa.png",
            "sizes": "256x256",
            "type": "image/png"
        },
        {
            "src": "pwa.png",
            "sizes": "384x384",
            "type": "image/png"
        },
        {
            "src": "pwa.png",
            "sizes": "512x512",
            "type": "image/png"
        }
      ]
}F
Note: From testing, it seems that you need to provide an image with dimensions of at least 144×144 pixels, to include it in the icons array within the manifest file.
The manifest file must include the app's name and a short_name, with the latter used on the home screen where space is limited. Additionally, it requires a start_url, defining the URL the app should open when launched from the home screen. Ensure this URL is cached to benefit from offline functionality; otherwise, the app won’t work offline. Moreover, a set of icons is needed for various purposes such as the home screen icon and splash screen. Each icon in the array must specify the source, size, and type.
Optionally, you can specify the background and theme color used by the browser, along with the icon, as part of the splash screen configuration. Once the app is loaded, the theme color informs the browser about the color to be used in the UI for the address bar or notifications.
After completing the manifest file, it's crucial to ensure the browser recognizes it. To achieve this, simply add a link to the manifest file within the index.html file.
//service-worker.js
<link rel="manifest" href="manifest.json">
Web App install banners offer a convenient way to prompt users to add our web app to their home screen. Some browsers have a powerful feature where they automatically handle the prompt to add the web app to the home screen when certain heuristics are met.
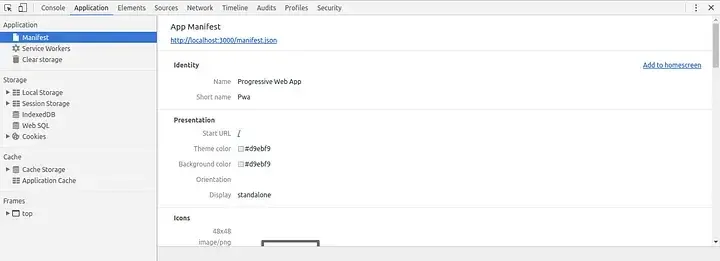
If supported by the browser, we can utilize the Manifest tab on the Application panel of Developer Tools. From there, simply clicking on "Add To Homescreen" enables easy access to launch the app.
You've successfully made your web app installable and displayed on the home screen, mimicking the experience of a native app but delivered through the web.
To validate the progressive web app features on your site, you can utilize the Chrome Extension: Lighthouse.
Grey out parts of the UI when offline
Up to this point, our site is fully prepared to operate offline!
Additionally, you can enhance the user experience by notifying them of their online or offline status. By incorporating event listeners for online and offline events, your site can react dynamically as the browser switches between online and offline modes on each page.
//index.html
<script>
window.addEventListener('load', function() {
   function network_status(event) {
       if (navigator.onLine) {
          console.log("You are online!");
          var e = document.getElementById("snackbar");
          e.innerHTML = "You are online!";
          e.className = "show", setTimeout(function() {
          e.className = e.className.replace("show", "")
          }, 1500)
       }
       else
       {
         console.log("You are offline!");
         var e = document.getElementById("snackbar");
         e.innerHTML = "You are offline!";
         e.className = "show", setTimeout(function() {
         e.className = e.className.replace("show", "")
         }, 1500)
       }
   }
window.addEventListener('online', network_status);
window.addEventListener('offline', network_status);
network_status();
});
</script>Furthermore, include an HTML element in index.html to display the message "You are offline!" when the user is not connected to the Internet.
You can implement a snackbar to display this message. If you're unfamiliar with snackbar, you can learn more about it here.
//index.html (inside body tag)
<div id="snackbar" class="hide">You are Offline!</div>
Implement a grayscale filter over the content when the user is offline by applying CSS to the page.
// css (addaclassofgrayfiltertocss)
.is-offline {
   filter: grayscale(1);
   cursor: default;
 }
//index.html
<script>
window.addEventListener('load', function() {
function network_status(event) {
if (navigator.onLine) {
console.log("You are online!");
document.documentElement.classList.remove("is-offline");
var e = document.getElementById("snackbar");
e.innerHTML = "You are online!";
e.className = "show", setTimeout(function() {
e.className = e.className.replace("show", "")
}, 1500)
}
else
{
console.log("You are offline!");
document.documentElement.classList.add("is-offline");
var e = document.getElementById("snackbar");
e.innerHTML = "You are offline!";
e.className = "show", setTimeout(function() {
e.className = e.className.replace("show", "")
}, 1500)
}
}
window.addEventListener('online', network_status);
window.addEventListener('offline', network_status);
network_status();
});
</script>That's it! You now have an installable web app, similar to a native app, capable of functioning even when offline.
That concludes our comprehensive guide to kickstarting your first progressive web app. By following these steps and keeping in mind the core principles of PWAs, you'll be well on your way to delivering a fast, reliable, and engaging user experience across all devices. And remember, you're not alone in this journey – here at SoluteLabs, we're passionate about progressive web apps and are constantly working on developing cutting-edge PWAs that push the boundaries of what's possible. If you're looking for a partner to help you create your first PWA, we'd love to hear from you!
Frequently Asked Questions
Have a product idea?
Talk to our experts to see how you can turn it
into an engaging, sustainable digital product.


